017 — Guide for creating or deleting an extension
Administrator’s guide to creating or deleting an extension from your phone system from Studio, Ubity’s online management portal.
1 Log into the Ubity web interface
Interface Address: studio.ubity.com
Username: your e-mail address
To obtain a password, you must request one on the interface (click on Recover your password) because Ubity does not have access to them for security reasons.
2 Create an extension
Go to the My account tab, click on Extensions, then Manage extensions, and then on Add extension…

Depending on your needs, you can:
- Enter a number you have chosen;
- Click on one of the extensions proposed by the system.

Warning: Some numbers are not available because they are used for other services (examples: 311, 511, 911 …). If you choose one of these extensions, the mention «invalid extension» will appear. You will have to choose another number.
Once the extension number has been chosen, you can opt to assign a voicemail to it and/or list it in the company directory.

You can choose how you want to assign the extension.

Note: All of these options can be changed later.
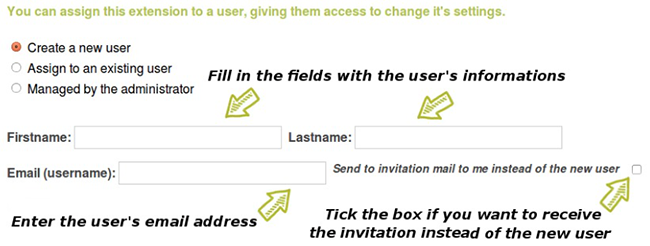
Create a new user

Warning: Select this option if the user has not been created yet. If you assign an extension to a new user, it will automatically be created with the information you enter in Name, Last Name and Email fields.
Note: It is important to give an email address that is, or will, be functional because it will be used to send the password and it can not be changed later. If the email address is not active yet or if you do not want the user to receive the email of the account creation, check the option send me email instead of the new user. The information will be sent to your email address.
Assign to an existing user
If you select this option, the list of users of the company will appear and you can choose the person to which you want the extension assigned. The information of the selected file from the list will be used for the new extension.

Managed by administrator
If you select this option, it is the administrator who will be responsible for the extension. It will be added to the list of extensions and can be renamed if necessary.

Once all fields have been completed, do not forget to click on Add extension to validate its creation.
You will automatically be directed to the setup page of the extension and you can choose different options for this extension (see document Manage your extensions). Be sure to save the changes for them to be updated.
3 Remove an extension
Go to the My account tab, click on Extensions, then Manage extensions, and then on All extensions.
Click on the Modify button located at the end of line corresponding at the extension you want to delete.

Click on the Delete button located at the bottom of the page.
The system will ask you to confirm the removal of the extension.

Once the transaction is confirmed, you will automatically be redirected to the list All extensions and a note will confirm its removal.
To find out more about phone extensions, also visit: