
Administrator’s guide to the Address book of your phone system from Studio, Ubity’s online management portal.
1 Log into the Ubity web interface
Username: your e-mail address
To obtain a password, you must request one on the interface (click on Recover your password) because Ubity does not have access to them for security reasons.
2 View your Address books
You must go to the Tools tab and click Address book.
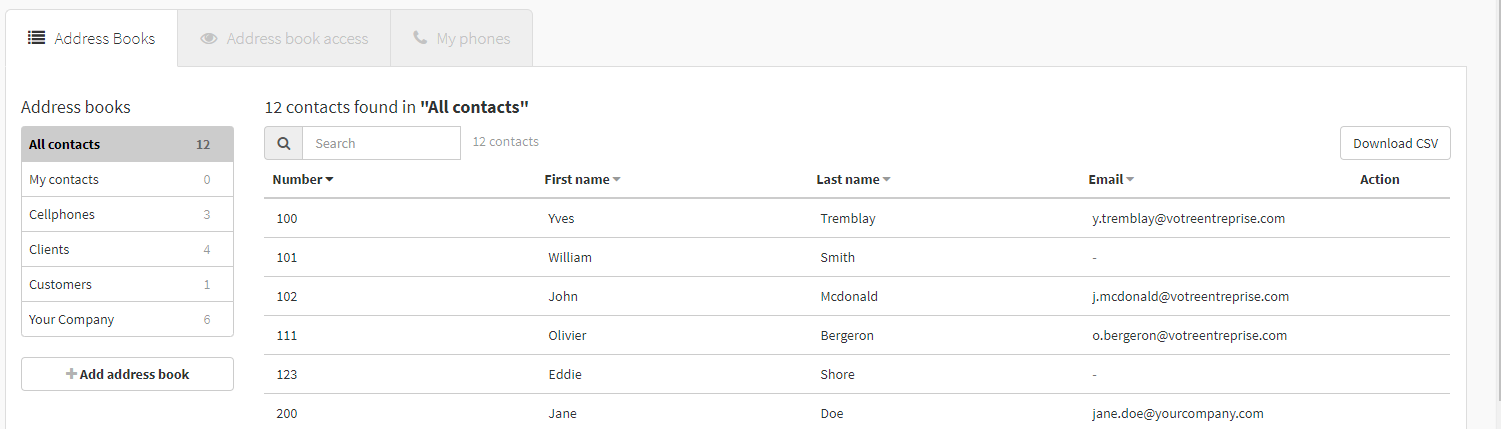
- The tab Address books allow you to access and manage all the Address books.
- The tab Address books access allows you to manage the access of your users to the different Address books.
- The tab My phones allows you to manage the contacts you wish to have on your physical phones registered with Ubity.
- The Search field allows you to enter a name, number or extension partial or complete. The search will be done in the Address book selected
3 Identify your Address books
The Address book All contacts is the list of all the contacts you have access to. It is the one that appears first by default.
The Address book My contacts is the list of the contact created by the user. Each user has one only and is the only who can see, modify and use the contacts.
The Address book with the name of your account, is created and up dated automatically by the system. It includes all extensions in your account.
4 Manage your Address books
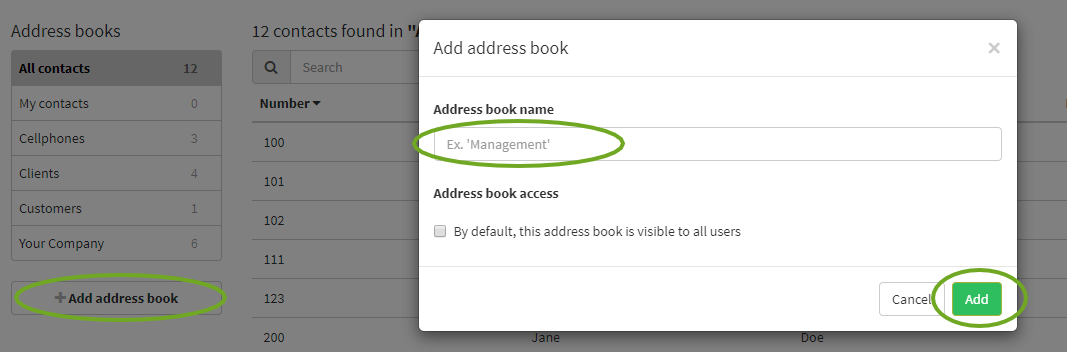
Create a new shared Address book
You must go to the Tools tab, click Address book then on Add Address book.
Note:
- The visibility allows you to give access to the Address book only to the users that needs it.
- The visibility can be change at all times.
- You may create as many shared Address books as you wish.
- Any user created after a Address book will need to be given access.
The following pop-up will confirm that the Address book has been added.
You will then be in the Address book and will be able to add contacts
Modify an existing shared Address book
You must go to the Tools tab, click Address book then on the « … » next to the name of the Address book you need to update, it will show the different options you have for the selected Address book.
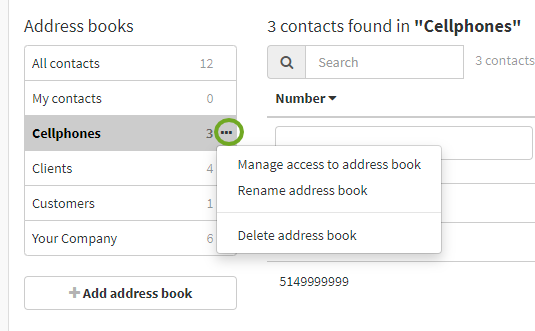
Modify the visibility of a shared Address book
To change the visibility of a Address book , click on Manage access to Address book then, in the user list, select the ones that should see the Address book.
You may also access this by clicking directly on the tab Address books access and select the Address book needed.
Note: You may click on Select all if you wish all users to have access to the Address book.
Attention: You will need to give access to this Address book to all users created after.
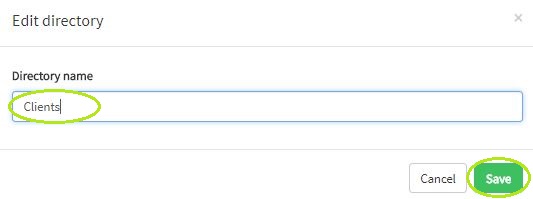
Modify the name of a shared Address book
To change the name of a Address book, click on Rename Address book, up-date the name and click on Save.
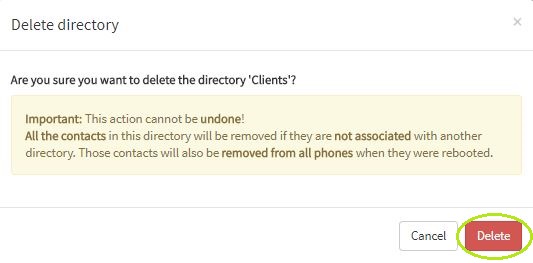
Delete a shared Address book
To delete completely a Address book, click on Delete Address book and confirm your choice. Please make sure to read the warning before confirming your choice.
5 Manage your contacts
Add a new contact
You must go to the Tools tab and click Address book.
Add a new contact in an existing Address book
To add a contact in an existing Address book, click on the name of the address book then fill out the fields provided with the contact information: phone number, first name, last name and email (optional) and confirm by clicking on the symbol « + ».

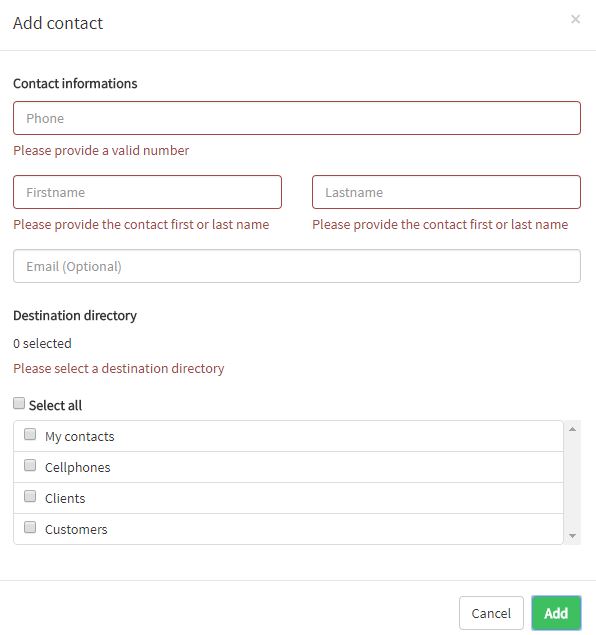
Add a new contact in more than one Address book
To add a contact in more than one Address book, click on “Add contact” then fill out the fields provided with the contact information: phone number, first name, last name and email (optional) and the Address books it should be added to.
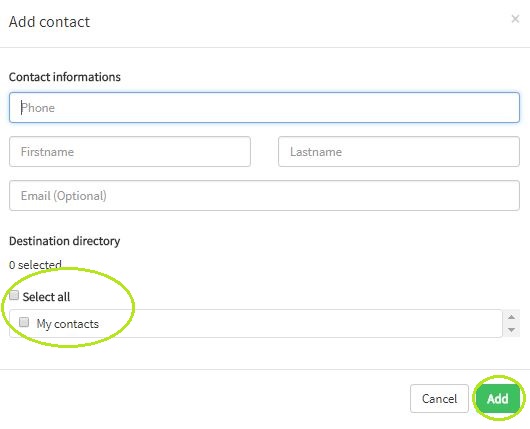
Note:
- The email addresses of your contacts are optional and will not be used by our system.
- The phone numbers of your contacts can be internal extensions or external numbers. Numbers must be without space or dash.
- If you have made a mistake, simply click on the correct line and the new fields will be editable. They will flash green to indicate that the changes have been saved.
Once all the field properly completed confirm by clicking on Add. The following pop-up will confirm that the contact has been added.
Add multiple contacts to an address book
You can upload (import) a list of contacts to one of your Ubity Address books by using a CSV file.
Download the CSV template
Under the tools menu, under Address books, select the book to which you wish to add a list of contacts, and click on Download CSV template in the roll-out menu that appears under Add contact.
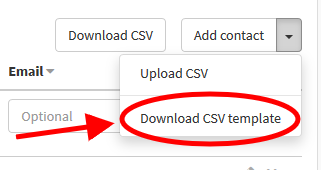
Note: The name of the address book is automatically created and managed by the system and cannot be customized bearing your account’s name.
Fill in the CSV file
Open the CSV template downloaded and fill in the different columns (Number, First Name, Last Name, Email) with your contact information, each contact representing one line.
Important: The order of the columns in the file must be respected, and additional columns must not be added. This could prevent the list from being imported correctly.
Save the “template.csv” file while making sure to keep the CSV file format.
Note: In the event that the file you have downloaded opens in Excel and is formatted inappropriately like in the example that follows, you may have to convert the text into columns by following the instructions below.
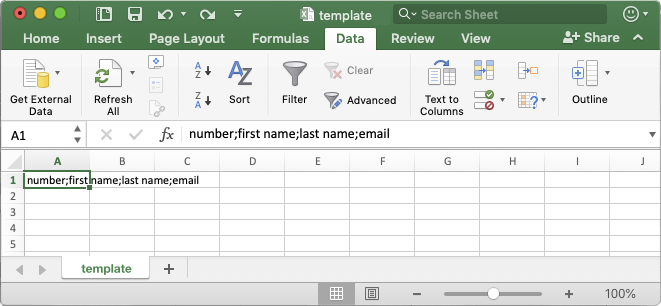
To convert the text into proper columns, click on the Text to columns button from the Excel Data tab.

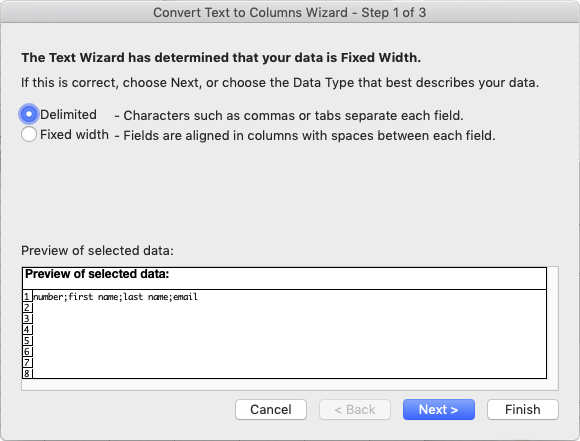
Select the Delimited Data Type option and click Next >.
Select Semicolon as the delimiter contained in the data and click Finish.
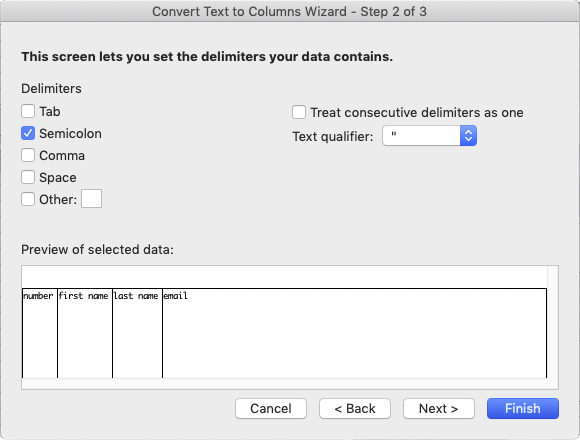
Now your file should now be laid out properly and be ready to fill in.
Upload the contact list
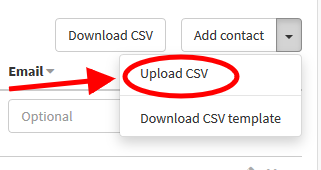
In Studio, within the Address Books tool, identify the book to which you wish to add a list of contacts, and click on Upload CSV in the roll-out menu that appears under Add contact.
Choose the CSV file that you have updated with you contact list and saved to your computer, and click on Open. The system will process your file and add your contacts to the address book.
Modify an existing contact
![]() To change the information of a contact, click on the edit button at the end of the line corresponding to the contact you want to up-date. A pop-up with the information of the contact will appear, make your changes and click on Save.
To change the information of a contact, click on the edit button at the end of the line corresponding to the contact you want to up-date. A pop-up with the information of the contact will appear, make your changes and click on Save.
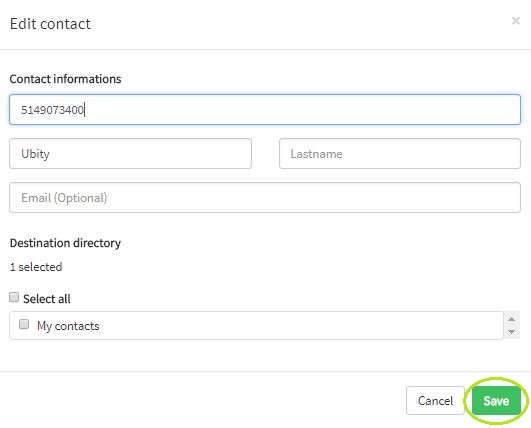
Note: Only the administrator may modify the contacts from shared Address book.
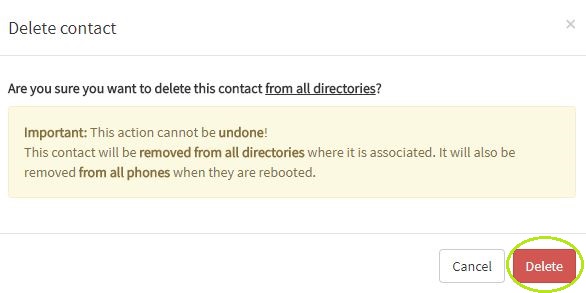
Delete an existing contact
![]() To delete a contact, click on the delete button at the end of the line corresponding of the desired contact. A pop-up will appear with the consequences of this action, please make sure to read the warning before confirming your choice.
To delete a contact, click on the delete button at the end of the line corresponding of the desired contact. A pop-up will appear with the consequences of this action, please make sure to read the warning before confirming your choice.
6 Show contacts on phones
You must go to the Tools tab, click Address book then select the tab My Phones.
Note : Once the contact list organized on the portal, you need to save the configuration by clicking on Save and reboot the phone, by using the button Restart the phone or by unplugging and plugging back physically the phone, to have the configuration up-dated.
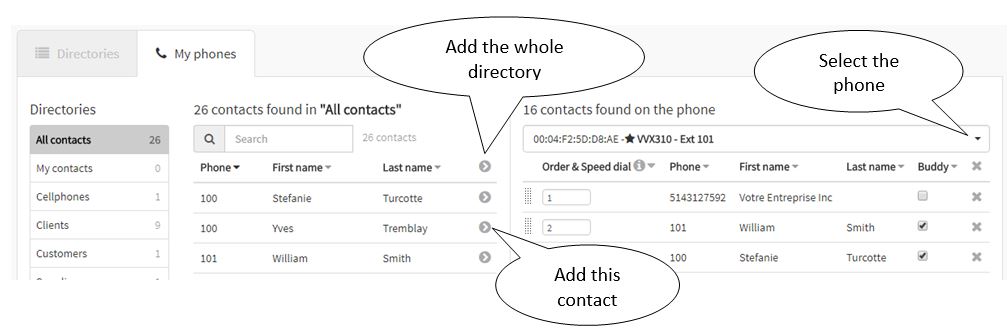
Add contacts on a phone
To add a contact in the Address book of a phone, select the desired phone in the scrolling list on the right then the Address book where the contact is. To add the whole Address book, click on the around at the top of the column. If you want to add only one contact click on the arrow at the end of the line corresponding of the desired contact.
The contact added in the phone will appear in the right column and will be colored grey in the central part.
Organize contacts on a phone
![]() To organize the contacts, click on the dots in front of the line you need to move and drag it to the proper place.
To organize the contacts, click on the dots in front of the line you need to move and drag it to the proper place.
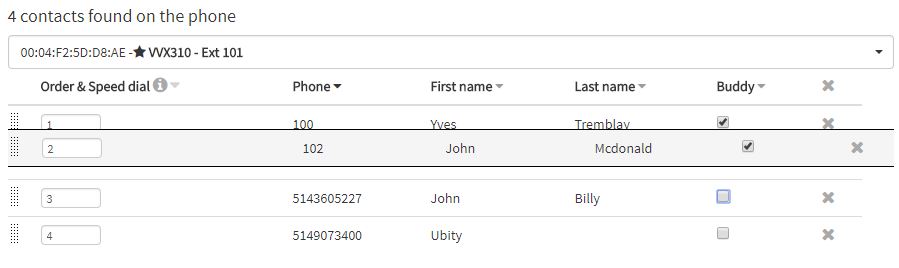
Attention: If you move contacts make sure that there are no duplicate in the order.
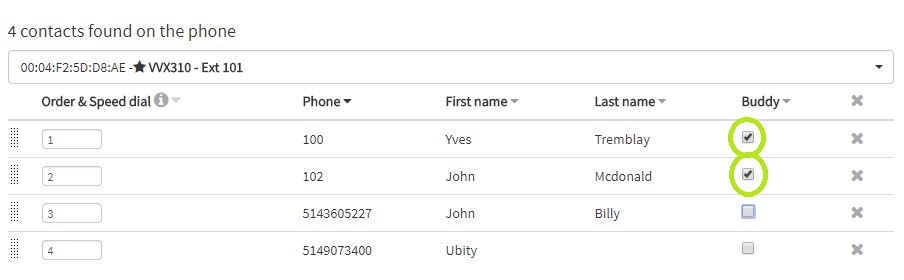
Monitor contacts’ status
Once the contacts added to the phone, you may decide to monitor their status, that is to say see if they are on the phone or not. To do so, check the Buddy checkbox of the contact you wish to monitor.
Note: You may only monitor the status of extensions of your company registered with Ubity.
Delete contacts from a phone
To delete a contact from a phone, you need to select the desired phone in the scrolling list on the right then click on the cross of the matching contact.
To delete the complete list of the phone, click on the cross at the top of the column.
Notes:
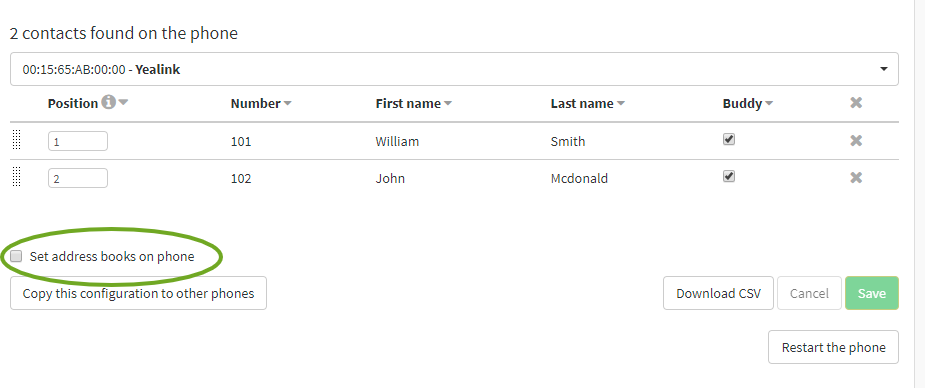
- Yealink phone users have the possibility to push their Ubity Address books structure to their phone to make searching contacts on their phone easier.
- Simply check the « Set address books on phone » box prior to saving and restarting your phone.
Copy the configuration on other phones
To copy the same configuration of a specific phone on other phones, you need to select the desired phone in the scrolling list on the right then click on the button Copy this configuration to other phones

Then select the phone(s) that needs the same configuration, confirm your action and click on Apply. Please note that you need to reboot the phone(s) for the up-date to be applied.

The following pop-up will confirm that the configuration has been applied to the phone(s)
Notes:
- The up-date will be complete once the changes saved, applied and the phones rebooted.
- If the phones is in use when the option Restart the phone is selected, it will reboot at the end of the call.
- It may take up to 5 minutes for a phone to reboot once the option selected.
- Some brands and models do not need to turn on and off to apply the up date.
- Some brands and models do not apply the order of the buddies when accessed through a speed-dial or a one-touch button
