
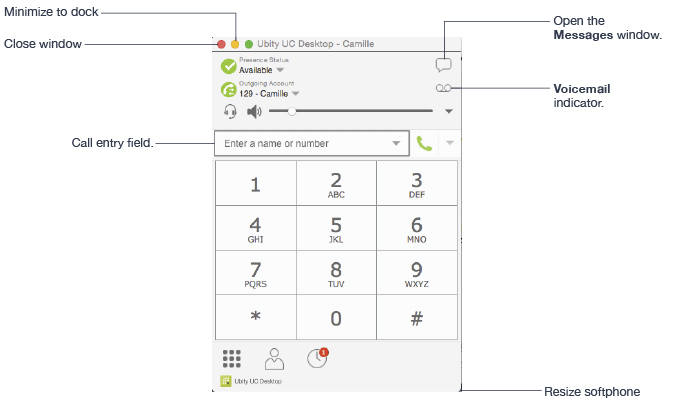
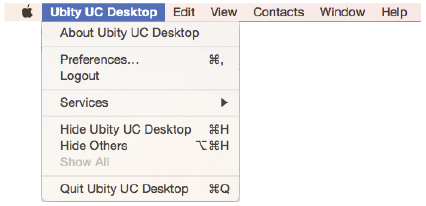
1 Ubity UC Desktop Menu
The onscreen softphone
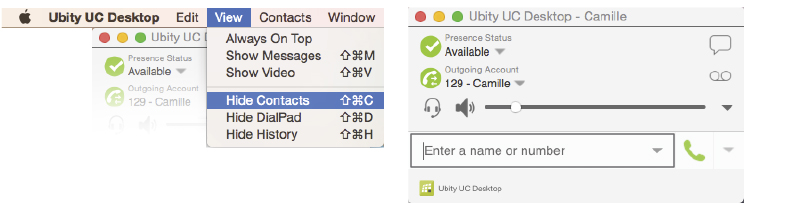
Compact View
To create this compact view, go to Ubity UC Desktop, click View and hide all the resources tabs including the Dialpad.
Ubity UC Desktop Menu
The menu contains the following items that are specific to Ubity UC Desktop:
- Ubity UC Desktop > Preferences.
Sign Out
To log off and minimize Ubity UC Desktop to the system tray. If you click the Ubity UC Desktop icon in the status bar, the Login screen appears. This menu item does not appear if you have configured Ubity UC Desktop for no login.
View
Changes how Ubity UC Desktop looks. Also lets you view the messages.
Contacts
Lets you work with contacts.
Help
Provides access to various service-related features.
2 Placing a call
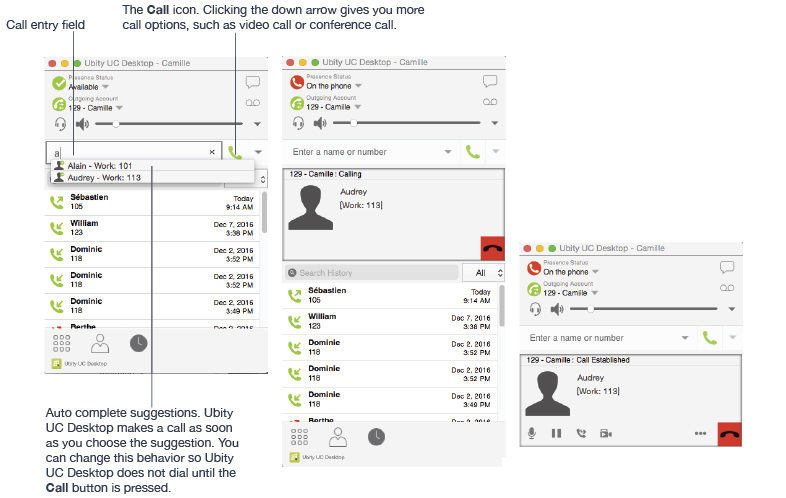
Place the call as described in the table below. The outgoing call opens in its own call panel, below any other existing call panels. You will hear a ringing tone while Ubity UC Desktop attempts to make a connection.
| Option | From the… | Description |
|---|---|---|
Keying |
Dialpad or computer keyboard |
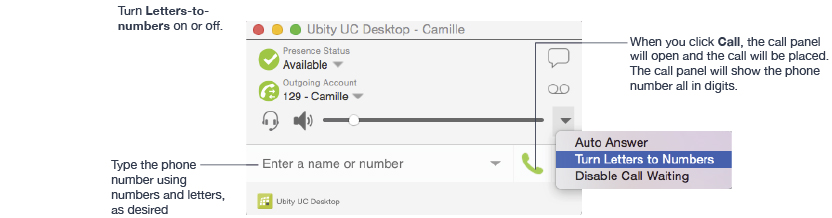
1 Enter the number or address in the call entry field using the dialpad or the computer keyboard. To turn letters to numbers. As you type, a suggestion for completing the entry may appear. Choose the suggestion or keep typing. 2 Click the Call button or press Enter. |
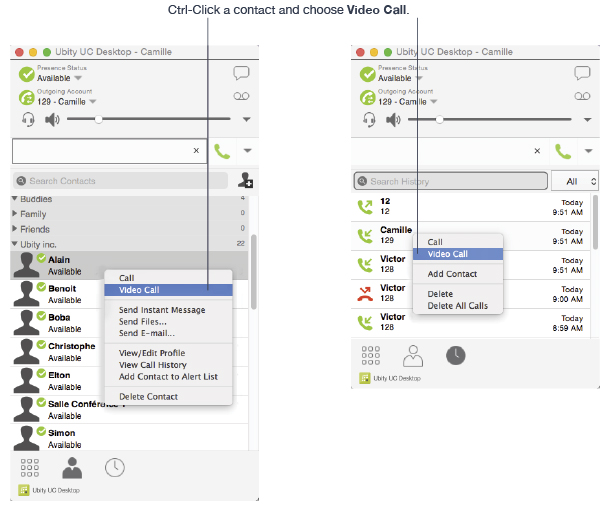
Control-click a contact |
Contacts tab |
Control-click an entry from the Contacts tab and choose Call or Video Call. (If the tab contains lots of entries, first search or filter the list). |
Double-click a contact |
Contacts tab | Contacts have a “double-click” action that either makes an audio phone call or starts an IM. |
Single-click a contact |
Contacts tab | Hover over the right side of the contact to reveal the Click-to-call button. Click to place a call using the primary phone number for this contact. |
Redial |
Redial button |
An audio call is placed. |
Dialing |
Dialpad | 1 If the dialpad is not visible, click the Phone button at the bottom. 2 Click the numbers on the dialpad to enter the phone number. 3 Click the Call button or press Enter. |
From an instant message |
Messages window | Click the menu at the top of the Messages window and choose Call. |
Selecting the Account to Use
This information applies only if you have more than one SIP account set up and enabled.
When you place a call, you can explicitly specify the account to use for that call.
The account selection options appear only if you have two or more SIP accounts that are enabled and being used for phone calls.
Letters to Numbers
You can type letters and Ubity UC Desktop will convert the letters to numbers when placing the call:
Placing another Call
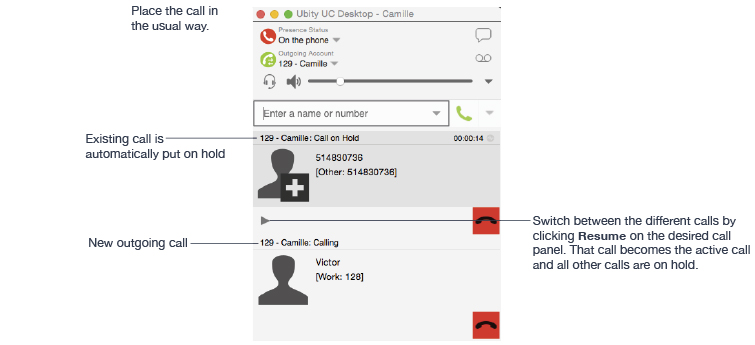
You can place another call. There is no limit to the number of calls you can make, although eventually the quality of audio and video will degrade because of limitations on the computer.
3 Handling Incoming Calls
Ubity UC Desktop must be running to answer incoming calls. (If Ubity UC Desktop is not running, incoming calls may be directed to voicemail; check with your VoIP service provider or system administrator.)
When Ubity UC Desktop is in the foreground, the new call appears in its own call panel. When Ubity UC Desktop is in the background (the focus is on other application), the incoming call notification appears in the upper-right corner. To receive notifications, make sure that you configured both system preferences on Mac OS as well as Ubity UC Desktop’s alerts preferences.
When Ubity UC Desktop is in Foreground
When Ubity UC Desktop is in Background

The notifications do not indicate whether the incoming call is an audio or video call. If the incoming call is a video call, Ubity UC Desktop will answer with video.
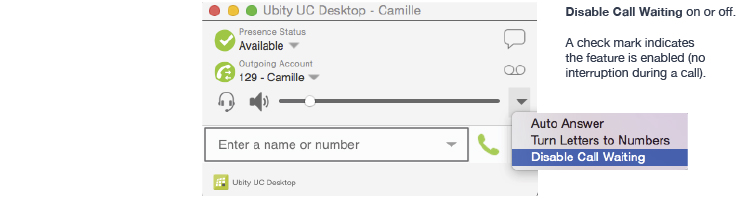
Auto Answer
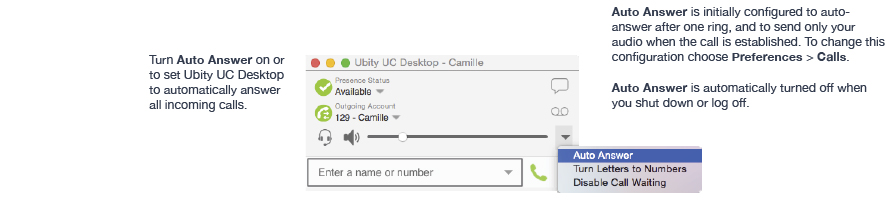
Auto answer is initially configured to auto-answer after one ring, and to send only your audio when the call is established. To change this configuration choose Preferences > Calls.
Auto answer is automatically turned off when you shut down or log off.
Disabling Call Waiting
You can turn on Disable Call Waiting. If on, when you are on a call, any new incoming call will go straight to voicemail or will ring as busy (to the caller). In this way, you are not distracted by incoming calls.
You can enable this feature even during a call, and it will take effect right away. The call will appear in the Missed Calls in the History tab.
4 Handling an Established Call
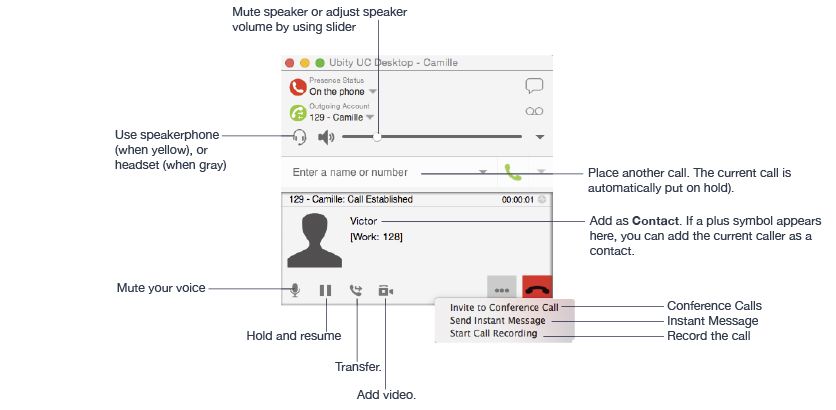
Ending a Call
Click the End call button on the Call panel (the call can be active or on hold). The Call panel closes after a few seconds.
Transfering a Call
Basic (Unattended) Transfer – Transfer this Call
Attended Transfer – Call then Transfer
You can first speak to the target (the person you are transferring the call to), then click Transfer Now to complete the transfer.
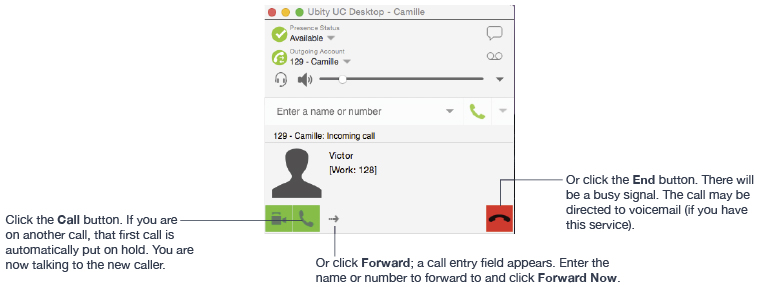
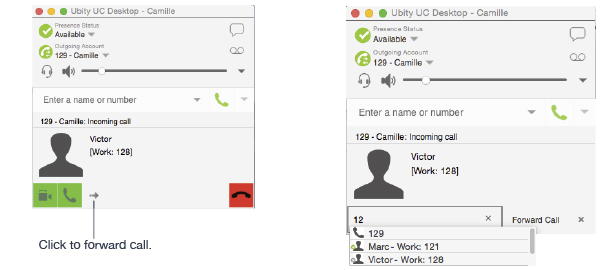
Forwarding Calls
5 Handling Video Calls
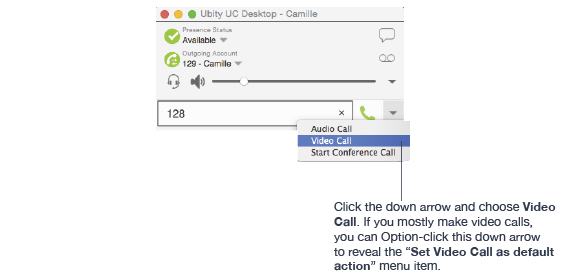
Placing a Video Call
Calls made with Ubity UC Desktop will work without a video camera, but a video camera is necessary to allow other parties to see your image. Ubity UC Desktop will work with most USB video cameras. This option needs to be enabled in Ubity’s web management portal, Studio, in the extension settings.
From the Dashboard
From the Contact List or History
Adding Video
If you have a camera, you can add video to a call that started as an audio call.
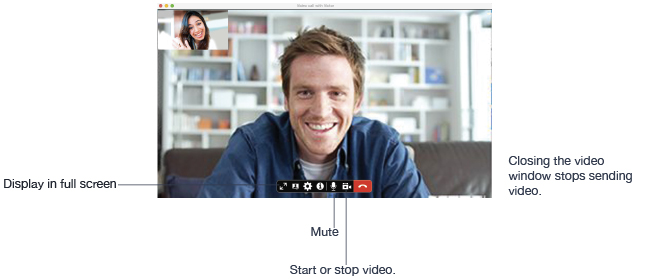
Click Start Video (![]() ) in the Call panel. When you add video, the other party may (or may not) start sending their video to you.
) in the Call panel. When you add video, the other party may (or may not) start sending their video to you.
Other Party Adds Video
If the other party starts their video, your video window automatically opens and the video is played. You can start sending your own video, if desired (and assuming you have a camera) by clicking Start Video (![]() ) in the Call panel.
) in the Call panel.
Pausing and Resuming Video
Click Stop Video in the call panel or close the video window to pause sending your video. Click Start Video to resume sending your video; the video window will open.
6 Conference Calls
Starting a Conference Call
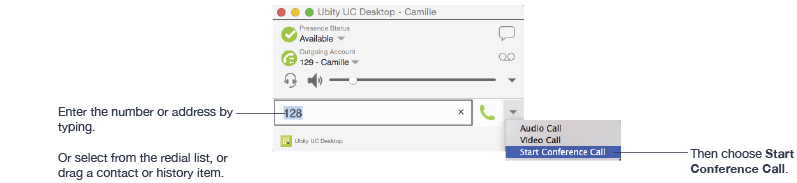
You can start a conference call by:
- making a conference call from the dashboard,
- adding participants to an existing established call, or
- having two established calls and merging them to a conference call.
From the Dashboard
From an Existing Call
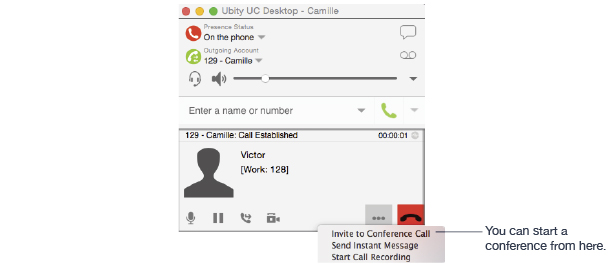
From One Established Call
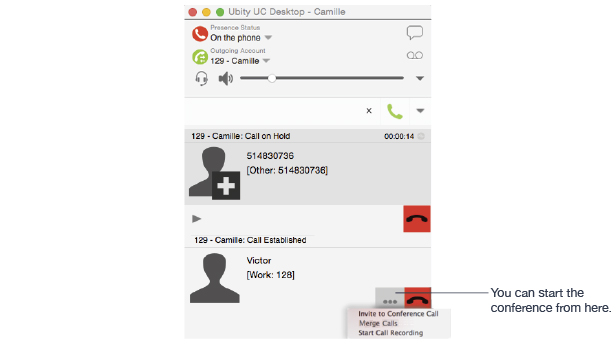
From Two Established Calls
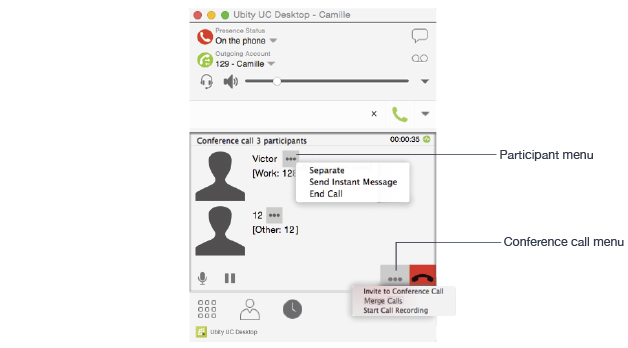
Managing the Conference
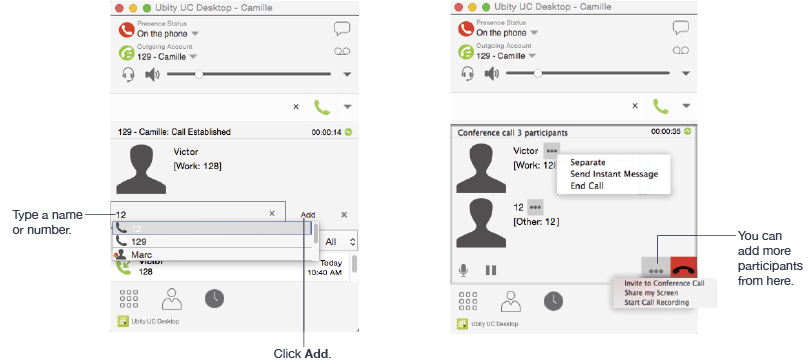
Adding More Participants
You can add more participants to an existing conference in any of these ways:
- Ctrl-click on a contact and choose Add to Conference Call.
- In the conference call panel, click Invite to Conference Call, enter a name and then click Add.
- Add in a separate call that is not part of the conference call. In the call panel for the individual call, click the down arrow and choose Merge Calls. This call is added to the conference call.
Recording a Conference Call
Click the More (three dots) button to reveal the Start Call Recording menu. See page 26 for more details.
Sending an Instant Message
Click the down arrow beside a participant name and choose Send Instant Message.
Removing a Participant
To remove one call from the conference, click the down arrow beside a participant name and choose Separate. The call becomes a separate call.
Ending the Conference
To hang up on everyone, click the End button.
Suspending the Conference
To suspend the conference, click the Hold button. All participants are put on hold.
If you need to speak to one participant separately, put the conference on hold, separate the one participant from the conference, take that person off hold. When done, merge the participant back into the call.
Video Conference Calls
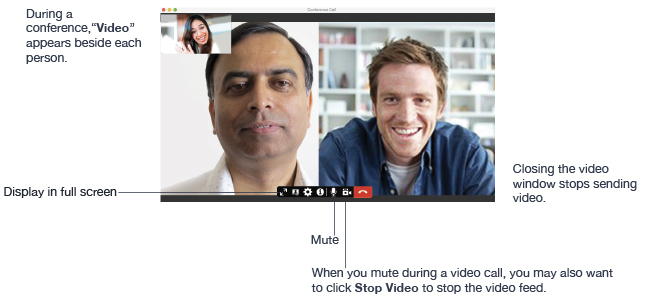
Starting a Conference with Video
When you start a conference from established calls, video is included if at least one of the calls already includes video. Video is sent to all the participants.
When you start a conference from scratch, video is not included. You can open your video window and choose to add video at any time. Video is sent to all the participants.
How Video Is Shared
The conference host (the person who starts the conference) serves as the host for other video. Whatever the conference host is receiving will automatically be sent to the other parties.
If the conference host pauses or stops video, other participants will no longer receive video.
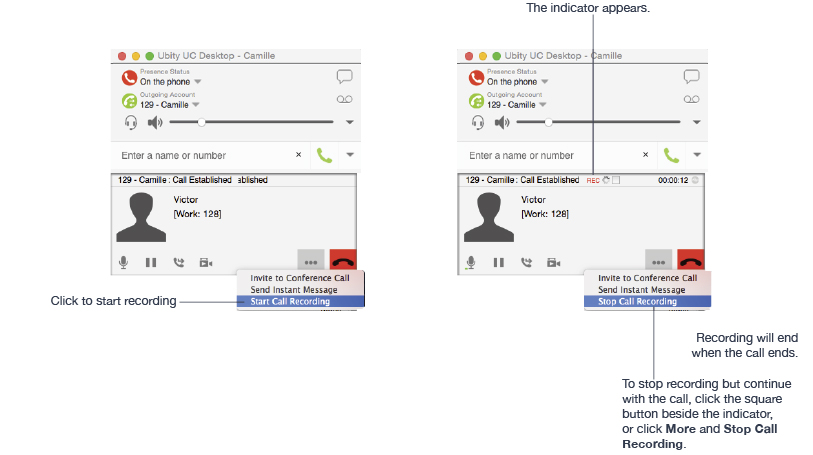
7 Call Recording
You can record the audio portion of a one-to-one call or a conference call. The recording will be saved as a WAV file on your computer.

Files Created when Recording Conference Calls
Multiple files might be created depending on how and when you start recording.
If you start recording a conference call from the beginning, the recording will continue until the conference call ends. One file will be created.
If you separate a participant from a recorded conference call and eventually have a one-to-one call, the recording will continue until the one-to-one call ends. Two files will be created : one for the conference call, and the other for the one-to-one call.
If you are already recording individual calls, the following will apply:
- After merging individual calls to form a conference, all the individual recordings will be stopped and a new recording will be created for the newly formed conference.
- After merging individual calls to an existing conference call, all the individual recordings will be stopped. If the conference call is being recorded before merge, the recording of the existing conference call will continue.
For example, if you record two individual calls and merge them, three files will be created: one for the conference call, two for individual calls before merge.
8 Voicemail
If your service includes voicemail and you have set up voicemail options, then when you have voicemail messages, the voicemail icon appears at the top of the phone (the icon may include a number). You can click the icon to automatically connect to voicemail and listen to your messages.

